Automating Arista EOS
Introduction
This is a guide on how to automate Arista network infrastructure with a modern GitOps workflow. Technical engineers and architects will gain the most by reading, but business leaders and strategists who are interested in pursuing network automation goals could benefit from the big picture ideas presented here as well. In short, this guide is an example of how large enterprises can implement useful network automation at global scale and at minimal cost using a set of open-source tools.
Network engineering is somewhat behind the times in the automation landscape. The best that most of us have managed is a collection of Python scripts or Ansible playbooks that are intended for one-off tasks. For everything else, there is a reliance on expensive, proprietary solutions which purport to automate networks but achieve little more than abstracting network operations from the engineers managing them.
I was stuck in this boat for years until I joined a global tech company and met their team of DevOps and systems engineers. I was impressed by the sophistication of their solutions, and before long, I elected rather naively to adopt their approaches into the networking sphere. The learning curve was immense, and the process was painful — but the resulting knowledge serves as the foundation of this guide.
The end result and basic idea of our Arista EOS automation workflow is this:
Switch configurations are managed in code and subject to review and approval policies in GitHub.
Switch configurations are enforced. GitHub always remains the source of truth for switch configs.
New switches only need be powered up with a connected management interface to be fully provisioned and managed with code.
Greenfield data center or campus networks can be pre-configured and rapidly deployed.
Tool Overview
This is a brief overview of each tool, its function, and some helpful links to get you started. Because we cannot explain everything about every tool, we strongly recommend that you read documentation to fill in the gaps. Each of these are popular and well-known pieces of software with significant community engagement. Use that to your advantage as you read along.
Salt
Salt is a domain-specific language (DSL). Like other DSLs, such as Puppet or Ansible, its purpose is to simplify large-scale device management. Salt was chosen for this project because it is simple to use, flexible, and reliable - among other practical reasons we will address later.
For more information about Salt and how to install it, check out the link below:
GitHub
GitHub is a widely-known source control platform which is used to help teams manage their code base. We will use it to store our Salt and Arista configuration files, Jinja2 templates, and other things.
Jenkins
Jenkins is an automation server that orchestrates continuous integration and continuous delivery (CI/CD) pipelines. In our case, it will be used to deploy files from GitHub to our Salt master server. This process is detailed in the section Automating Salt State Deployments.
Jenkins Install Guide
Red Hat Enterprise Linux
The Salt master must be installed on a Linux system. Most common distributions are supported, such as Ubuntu, OpenSUSE, RHEL, etc. Windows and MacOS systems cannot act as Salt masters. Our choice of RHEL was based simply on preference and compatibility. Our instance is hosted in AWS, but you can simply spin up a VM with a supported Linux distribution installed if you prefer.
GNS3 and Arista vEOS
GNS3 (Graphical Network Simulator 3) is a free application which allows you to create virtualized network environments using live network OS images. It is an extremely useful tool for labbing, testing, and learning network engineering concepts. The downside is that GNS3 doesn’t contain licensed OS images by itself - you need to provide them.
Luckily, if you don’t have access to licensed images elsewhere, Arista vEOS is freely available to download with an Arista account. The Arista EOS command line is very similar to that of Cisco IOS-XE 16. This guide uses Arista vEOS 4.31.1F.
GNS3 Home Page
Arista Home Page (Images are accessible via Support > Software Download)Zero-Touch Provisioning with ztpserver
Arista offers an open-source ZTP tool in the form of ztpserver. For the uninitiated, ZTP is essentially PXE boot for network gear. It allows engineers to pre-plan software versions, configurations, and other features before the device is even powered up. This guide includes detailed ZTP instructions in the final section, Provisioning an Arista EOS Minion with ZTP.
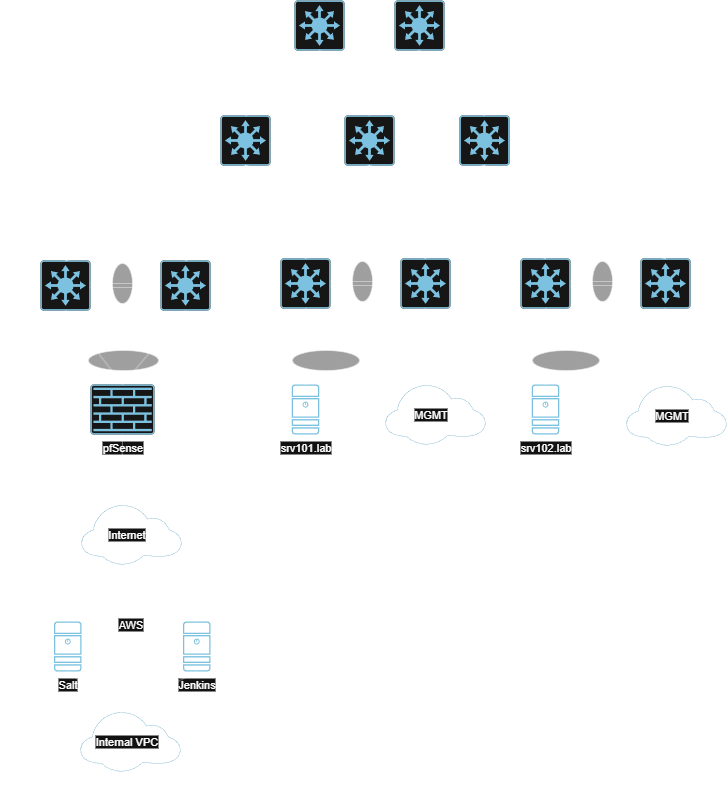
Topology Overview
Our lab network uses a standard spine-leaf design which is commonly found in modern data centers. Each pair of leaf switches uses MLAG to provide multi-chassis redundancy to the servers. Routing is handled with an eBGP underlay and an EVPN/VXLAN overlay. Each leaf switch is configured to use its management interface (which is in a dedicated management VRF) for communications to the Salt master. The configs are managed entirely by the automation solution described in this guide and can be viewed in our GitHub repository:
Installing and Configuring the Salt Master
Installing Salt is relatively straightforward. The installation instructions can be found here. Keep in mind that Windows and MacOS cannot run the salt-master service. They can only be minions.
Once you’ve installed Salt on your OS of choice, there are a few things left to do:
Basic Salt configurations on the master
Collect the Salt master’s public key. We will need this later.
Create firewall rules to allow Salt traffic inbound
The Master Config File
The first step after installing Salt is to configure it. We can do this by editing /etc/salt/master and then restarting the salt-master service. Many options exist for setting up a Salt master, but we’re only concerned with a couple of items: the system user who will run Salt, and the directories where our Salt files will be kept:
# /etc/salt/master

# The user under which the salt master will run.

user: salt

# This tells Salt where to look for its files.
# We chose a non-default layout.

file_roots:
  base:
    - /app/salt/data
    - /app/salt/data/_grains
    - /app/salt/data/templates
    - /app/salt/data/pillar
    - /app/salt/data/files
    - /app/salt/data/states
    - /srv/salt
That’s all we need to get started. Restart the Salt master service to apply the changes:
systemctl restart salt-master
Collecting the Master’s Public Key
Salt uses an encrypted connection known as the ZeroMQ bus between a master and its minions. To that end, each minion needs to know the public key of the Salt master in order to establish a connection to it. The public key can be displayed using the salt-key command as root:
[root@mymaster.amazonaws.com ~]# salt-key -F
Local Keys:
master.pem:  {Don't Share this! Share the string below.}
master.pub:  41:a1:e4:a1:d3:91:2a:07:87:75:dc:16:61:b3:34:ae:c1:3d:30:8b:c4:c2:dc:8f:4f:d8:2e:da:67:27:da:47
Copy the public key string and save it for later. You will need it while configuring the Arista salt minion.
Configuring the Firewall
Salt connections are initiated from the minions to the master on TCP 4505 and 4506. Therefore we need to open up our firewall on the master to permit this traffic. On RHEL variations, use firewall-cmd:
sudo firewall-cmd --permanent --add-port=4505/tcp
sudo firewall-cmd --permanent --add-port=4506/tcp
sudo firewall-cmd --reload
On Ubuntu, use ufw:
sudo ufw allow 4505/tcp
sudo ufw allow 4506/tcp
Installing the Salt Extension for Arista EOS
A quirk of Arista EOS is that it runs on top of Fedora, which means that users can easily access the Bash command line and treat the switch more-or-less like a Linux box. This is useful because it allows the base functionality of the switch to be expanded using RPMs, which Arista conveniently packages into files with the .swix extension. This walkthrough will demonstrate how to install a Salt minion extension for Arista EOS, how to configure basic Salt minion parameters, and how to establish a connection with the Salt master.
While the Salt extension is no longer easily found through official channels after Broadcom’s acquisition of VMWare, some mirrors still make it available. You can obtain 64-bit Salt minion extensions for Arista EOS at this link. Keep in mind that we use a 32-bit extension on a 32-bit Arista EOS image for this guide. Using a 64-bit extension requires a 64-bit Arista EOS image.
The first step is to copy the SWIX file to the switch. You can do this in a number of ways. We used SCP from bash:
leaf0101-1.lab# bash
Arista Networks EOS shell
[jelliott@leaf0101-1 ~]$ scp jelliott@myserver.lab:/path/to/salt-3005.1-1.32.swix /mnt/flash
[jelliott@leaf0101-1 ~]$ exit
leaf0101-1.lab#dir flash: | in salt-3005
       -rw-    56723374           Aug 23 05:45  salt-3005.1-1.32.swix
Now we need to install the extension and tell Arista EOS to start the extension at boot time. First, we copy the file from flash to the extensions directory. Then we install the extension, configure it as a bootable extension, then check its status:
leaf0101-1.lab# copy flash:salt-3005.1-1.32.swix extension:
leaf0101-1.lab# extension salt-3005-1-1.32.swix
leaf0101-1.lab# configure terminal
leaf0101-1.lab(config)# copy installed-extensions boot-extensions
leaf0101-1.lab(config)# exit
leaf0101-1.lab# show extensions
Name                       Version/Release      Status       Extension
-------------------------- -------------------- ------------ ---------
salt-3005.1-1.32.swix      3005.1/1             A, I, B      6


A: available | NA: not available | I: installed | F: forced | B: install at boot
S: valid signature | NS: invalid signature
The extensions are stored on internal flash (flash:)
Now that the extension is installed, the Salt minion configuration files need to be modified with specific information about the master and minion. The master finger is the public key of the Salt master, which is obtained in the previous section Installing and Configuring the Salt Master:
leaf0101-1.lab# bash
Arista Networks EOS shell
!
! Become root, delete the default minion file, and create
! a new one with the configs we need.
!
[jelliott@leaf0101-1 ~]$ sudo su
bash-4.2# rm -f /etc/salt/minion
bash-4.2# cat /etc/salt/minion
id: leaf0101-1.lab
master: mymaster.amazonaws.com
master_finger: '41:a1:e4:a1:d3:91:2a:07:87:75:dc:16:61:b3:34:ae:c1:3d:30:8b:c4:c2:dc:8f:4f:d8:2e:da:67:27:da:47'
Because the switches in our lab are using a management VRF to communicate with Salt, we need to modify the Salt minion service to use that VRF by editing its systemd service file:
bash-4.2# cat /usr/lib/systemd/system/salt-minion.service | grep ExecStart
ExecStart=/opt/saltstack/salt/run/run minion
!
! The above line needs to be updated to use the correct VRF.
! Use the following command to find the name of the VRF
! in Fedora, then edit the line accordingly.
!
bash-4.2# ip netns
ns-management (id: 1)
default
!
! Edit the line and save, then reload the service:
!
bash-4.2# cat /usr/lib/systemd/system/salt-minion.service | grep ExecStart

ExecStart=ip netns exec ns-management /opt/saltstack/salt/run/run minion

bash4-2# systemctl daemon-reload
Next, the management API must be configured to accept inbound PyEAPI calls from the Salt master, and user credentials must be supplied in order to authorize commands run by PyEAPI. This example uses plaintext credentials in the PyEAPI config file for simplicity. This is acceptable in a lab, but in production, you should use a secret management tool such as HashiCorp Vault to store the username and password for later retrieval.
leaf0101-1.lab(config)# show run | section management
management api http-commands
   protocol unix-socket
   no shutdown
   !
   vrf management
      no shutdown

leaf0101-1.lab(config)# bash

Arista Networks EOS shell

[jelliott@leaf0101-1 ~]$ sudo su
bash-4.2# cat /etc/salt/minion.d/pyeapi.conf
pyeapi:
  transport: https
  port: 443
  host: localhost
  username: myusername
  password: mypassword
Finally, pip and PyEAPI need to be installed and updated on the switch. These examples use the default VRF. If you’re using a non-default VRF, prepend these commands with ip netns exec {your-vrf-name}.
[jelliott@leaf0101-1 ~]$ sudo su
bash-4.2# python -m ensurepip
bash-4.2# python -m pip install --upgrade pip
bash-4.2# python -m pip install --upgrade pyeapi
Now you’re ready to start the Salt minion service and enable it to start automatically at boot time:
bash4-2# systemctl start salt-minion
bash4-2# systemctl enable salt-minion
At this point, the minion will attempt to reach the Salt master at the hostname or IP address configured in /etc/salt/minion. Logging into the master, we can see that our switch is trying to connect:
[root@mymaster.amazon.aws ~] salt-key -L
Accepted Keys:
Denied Keys:
Unaccepted Keys:
leaf0101-1.lab
Rejected Keys:
Now we can accept the key to finalize the connection and then run a test to make sure the Salt master can run operations against the switch:
[root@mymaster.amazon.aws ~] salt-key -a leaf0101-1.lab
The following keys are going to be accepted:
Unaccepted Keys:
leaf0101-1.lab
Proceed? [n/Y] Y
Key for minion leaf0101-1.lab accepted.
[root@mymaster.amazon.aws ~] salt 'leaf0101-1.lab' test.ping
leaf0101-1.lab:
    True
Using PyEAPI from the Salt Master
PyEAPI can be used to run arbitrary commands against the Arista EAPI from the Salt master, apply configurations from Jinja2 templates, and gather data. It is advisable at this stage to test PyEAPI actions against the Arista minion. Failures typically result from one of these common problems, all of which are addressed in the previous section, Installing the Salt Extension for Arista EOS:
The file at /etc/salt/minion.d/pyeapi.conf is missing, improperly formatted, or has bad credentials
The management API was not configured correctly or it isn’t started.
PyEAPI is not installed on the switch, or it is outdated.
You can easily verify whether or not PyEAPI is configured correctly by running a command against your Arista minion:
[root@mymaster.amazonaws.com ~] salt 'leaf0101-1.lab' pyeapi.run_commands 'show ip interface brief'

leaf0101-1.lab:
- interfaces:
    Ethernet1:
      interfaceAddress:
        ipAddr:
          address: 10.0.0.1
          maskLen: 31
      interfaceStatus: connected
      ipv4Routable0: false
      ipv4Routable240: false
      lineProtocolStatus: up
      mtu: 2000
      name: Ethernet1
      nonRoutableClassEIntf: false
...
...
If you want to see all of the options available for PyEAPI, you can generate the help menu like so:
[root@ip-172-31-47-152 ec2-user]# salt 'leaf0101-1.lab' pyeapi.
leaf0101-1.lab:
    ----------
    pyeapi.:
        'pyeapi.' is not available.
    pyeapi.call:

            Invoke an arbitrary pyeapi method.

            method
                The name of the pyeapi method to invoke.

            args
                A list of arguments to send to the method invoked.
...
...
If PyEAPI works as expected from the Salt master, you’re ready to move onto the more useful aspects of managing Arista gear through the use of Salt states, pillar data, and Jinja2 templates. More on those topics in the following sections.
Jinja2 Templates and Pillar Data
It’s helpful to cut through the terminology right away and explain what these things are in plain English, starting with Jinja2 templates. Jinja2 allows users to use Python-like logic to create configuration files. This is extremely useful for networking applications, because it’s often the case that much of a switch’s configuration is the same as other switches’, except some crucial variables such as IP addresses, which are typically unique to a single switch.
This is often handled by copying, pasting, and carefully editing the configs in something like Notepad by red-eyed network engineers. Obviously this is time-consuming and prone to error. Instead, what if we could write some code into a configuration template which grabs these unique variables automatically? That’s the job of Jinja2.
Picture a VLAN configuration on a switch. It typically looks something like this:
vlan 10
  name TestVLAN
!
vlan 20
  name AnotherTestVLAN
With Jinja2 templates, we can instead use some Pythonic code to script this:
{% for vlan in vlans %}
vlan {{ vlan.id }}
  name {{ vlan.name }}
!
{% endfor %}
When the template is rendered, something like the following would result:
vlan 10
  name TestVLAN
!
vlan 20
  name AnotherTestVLAN
!
vlan 30
  name YetAnotherOne
!
But where did those VLAN IDs and names come from? The answer is in the minion’s pillar file. For the purposes of this guide, a pillar file is a list of key-value pairs which can be used easily by Jinja2 to populate a configuration template. These files are always in YAML format, so they are simple to read and write.
Let’s imagine that the pillar file for our switch leaf0101-1.lab has the following section:
#/etc/salt/pillar/leaf0101-1.lab.yaml
vlans:
  10:
    name: TestVLAN
  20:
    name: AnotherTestVLAN
  30:
    name: YetAnotherOne
Imagine also that we have a Jinja2 template which looks like this:
#/etc/salt/templates/example.j2
{%- set yaml_file = '/etc/salt/pillar/leaf0101-1.lab.yaml' %}
{%- import_yaml yaml_file as pillar %}
hostname {{ pillar.get('hostname')}}
!
{%- for vlan, config in pillar.get('vlans', {}).items() %}
vlan {{ vlan }}
  name {{ config.get('name') }}
!
{%- endfor %}
When this template is rendered, the following configuration results:
hostname leaf0101-1.lab
!
vlan 10
  name TestVLAN
!
vlan 20
  name AnotherTestVLAN
!
vlan 30
  name YetAnotherOne
!
This can be expanded upon in numerous ways. In theory, you could represent any part of the switch configuration as YAML pillar data. Below is a help section from the pillar files located in our Salt Lab repository which demonstrates the flexibility which is possible:
#--------------------------------------     ------------------------------------------------------------------------
#         Interface Parameters                                  Interface Parameter Explanations
# --------------------------------------     ------------------------------------------------------------------------
# InterfaceName:                             <-- Name of the interface, e.g. 'Ethernet1' or 'GigabitEthernet0/0'
#   shutdown:              'True/False'      <-- If True, interface is 'shutdown'. If False, interface is 'no shutdown'.
#   description:           'String'          <-- Arbitrary interface description
#   interface_type:        'layer[2-3]'      <-- Switched interface == 'layer2' and routed interface == 'layer3'
#   switchport_mode:       'access/trunk'    <-- If interface_type == layer2, define whether port is in access (default) or trunk mode
#   access_vlan:           'integer'         <-- If switchport_mode == 'access', define access VLAN for the port
#   portfast:              'True/False'      <-- If interface_type == layer2, enable or disable Portfast
#   bpduguard:             'True/False'      <-- If interface_type == layer2, enable or disable BPDUGuard
#   rootguard:             'True/False'      <-- If interface_type == layer2, enable of disable RootGuard
#   ip_address:            'x.x.x.x/xx'      <-- If interface_type == layer3, define interface IP address and prefix length
#   ip_virtual_router:     'x.x.x.x'         <-- If interface type == layer3, define 'ip virtual-router address'
#   ip_address_virtual:    'x.x.x.x/xx'      <-- If interface type == layer3, define 'ip address virtual'
#   vrf:                   'String'          <-- If interface type == layer3, assign interface to VRF 'String'
#   autostate:             'True/False'      <-- If interface is an SVI, 'True' enables autostate (default)
#   mtu:                   'integer'         <-- Configure MTU
#   channel_group:         'integer'         <-- Configure port channel group
#   mlag:                  'integer'         <-- If interface is a port-channel, configure MLAG ID
#   source_interface:      'Interface Name'  <-- VXLAN-specific. Define VTEP source interface, e.g. 'Loopback1'
#   udp_port:              'integer'         <-- VXLAN-specific. Define UTP port for VXLAN encapsulation.
#   vlans:                                   <-- VXLAN-specific. Define VLANs and associated VNIs.
#     <int>:                                 <-- VXLAN-specific. Define VLAN ID to introduce into VXLAN (e.g. 10)
#       vni:               'integer'         <-- VXLAN-specific. Define VNI of parent VLAN.
Of course, managing configurations in this way requires a long and complex Jinja2 template, especially when additional logic is added for configuration enforcement and idempotence. It is far more common to simply include common switch configurations in the template as they should be, then use Jinja2 code to handle the variables:
hostname {{ pillar.get('hostname') }}
!
ip name-server 8.8.8.8
!
ntp server common.ntp.server
!
{%- for interface, config in pillar.get('interfaces', {}).items() %}
interface {{ interface }}
{%- if config.get('shutdown') and config['shutdown'] == 'True' %}
  shutdown
{%- elif config.get('shutdown') and config['shutdown'] == 'False' %}
  no shutdown
{%- endif %}
{%- if config.get('description') %}
  description {{ config['description'] }}
{%- endif %}
...
... etc.
Salt Grains
Outside of templates and pillar data, Salt uses another type of data called grains. Grains are essentially just facts about a minion, ranging from CPU architecture, to management IP addresses, to model and manufacturer. You can easily view grains (facts) for any or all minions from the Salt master. To see the list of available grains, use grains.ls:
[root@mymaster.amazonaws.com ec2-user]# salt "leaf0101-1.lab" grains.ls
leaf0101-1.lab:
    - biosreleasedate
    - biosversion
    - cpu_flags
    - cpu_model
    - cpuarch
    - cwd
    - disks
    - dns
    - domain
    - efi
...
...
To view the actual grain data, use either grains.get {name} to view a specific grain, or grains.items to see all grains for the minion:
[root@mymaster.amazonaws.com ec2-user]# salt "leaf0101-1.lab" grains.get disks
leaf0101-1.lab:
    - sdb
    - sr0
    - sda
[root@mymaster.amazonaws.com ec2-user]# salt "leaf0101-1.lab" grains.get eos_vlans
leaf0101-1.lab:
    - 1
    - 10
    - 20
    - 30
    - 60
    - 4094
[root@mymaster.amazonaws.com ec2-user]# salt "leaf0101-1.lab" grains.items
leaf0101-1.lab:
    ----------
    biosreleasedate:
        04/01/2014
    biosversion:
        1.16.3-debian-1.16.3-2
    cpu_flags:
        - fpu
        - de
        - pse
        - tsc
        - msr
...
... etc.
As you can see above, we used a grain called eos_vlans. This grain is not included in Salt, but it is a custom grain generated from a Python script. The script is copied from the master to the minion and then executed. This causes the minion to report the grain, which is a list of VLANs configured on the switch. You can view this script and other custom grains here.
The potential for custom grains is enormous, because they can enable true configuration enforcement for each Arista minion. For example, the eos_vlans grain could be used to view the existing VLANs on a switch and compare them to the VLANs configured in the pillar data. If a VLAN appears in the grain which is not listed in the pillar file, Jinja2 logic can be used to remove the undesired VLAN from the switch configuration.
In other words, grains give you a window into the actual state of a minion. You can compare the minion’s reported state (grains) with your desired state and handle those differences accordingly. This logic is used in our Jinja2 template, which was mostly generated by ChatGPT 5.
Applying Configuration Templates with Salt States
Now it’s time to tie everything you’ve learned about pillar data, grains, and Jinja2 templates together into something actionable. Salt states are the equivalent of Puppet manifests or Ansible playbooks. They are written in YAML and define a series of tasks to perform on a minion. This YAML file is copied to the minion and the state is executed locally.
With everything you know at this point, take a look at the following Salt state - apply_eos_config.sls - and try to guess what it does, then we’ll get into the details:
{% set hostname  = grains.get('id') %}

{%- if "leaf" in hostname or "evpn" in hostname  %}
Distribute Pillar Data to Switch:
  file.managed:
    - name: /tmp/{{ hostname }}.yaml
    - source: salt://pillar/{{ hostname }}.yaml

Sync Grains:
  module.run:
    - name: saltutil.sync_grains

Refresh Grains:
  module.run:
    - name: saltutil.refresh_grains
    - require:
      - module: Sync Grains

Render and Apply Configuration:
  module.run:
    - pyeapi.config:
      - config_file: salt://templates/tor_default.j2
    - require:
      - module: Refresh Grains

Save Configuration:
  module.run:
    - pyeapi.run_commands:
      - 'write memory'

{%- endif %}
As you can see, Salt states are very readable! It’s important to note that a Salt state contains actions which are executed on the minion - not the master. Let’s take it from the top:
We define a variable (hostname) which is equivalent to the “id” grain of the minion. You may remember that this is the same value we configured in the switch’s /etc/salt/minion file. We made this the same as the switch’s hostname.
If “leaf” or “evpn” appears in the hostname, proceed. If not, do nothing.
The minion copies its pillar file from the master and saves it to /tmp/{hostname}.yml
Sync and refresh grains on the minion. This allows us to use up-to-date information before we apply our template. If either step fails, the configuration will not apply due to the require operators.
Render the configuration template tor_default.j2 and apply the resulting configuration to the minion. This action is performed on the minion.
Save the configuration by running the command write memory on the switch.
Let’s try making a change to the pillar file for leaf0101-1.lab. We’ll add two new VLANS (50 and 55), remove an old VLAN (60), and configure an interface (Ethernet5) with various options:
vlans:
  10:
    name: Production
  20:
    name: Development
  30:
    name: RackSubnet
  50:
    name: Example-For-Blog
  55:
    name: Another-Example-For-Blog
  4094:
    name: MLAG

interfaces:
  Ethernet5:
    shutdown:           'False'
    description:        'Example-For-Blog'
    interface_type:     'layer2'
    switchport_mode:    'access'
    access_vlan:        '50'
    portfast:           'True'
    bpduguard:          'True'
When we apply the state, these changes are applied to the device. Remember when we mentioned that custom Salt grains can be useful? This is one example of why. When the minion reports its custom eos_vlans grain, the VLANs currently configured on the minion are compared with our YAML file. Any VLANs which are not in the pillar file are deleted, and new ones are added as they appear:
[root@mymaster.amazonaws.com ec2-user]# salt "leaf0101-1.lab" state.apply apply_eos_config
leaf0101-1.lab:
----------
          ID: Distribute Pillar Data to Switch
    Function: file.managed
        Name: /tmp/leaf0101-1.lab.yaml
      Result: True
     Comment: File /tmp/leaf0101-1.lab.yaml updated
     Started: 00:44:42.958807
    Duration: 1210.81 ms
     Changes:
              ----------
              diff:
                  ---
                  +++
                  @@ -15,8 +15,10 @@
                       name: Development
                     30:
                       name: RackSubnet
                  -  60:
                  -    name: Jenkins-Deploy
                  +  50:
                  +    name: Example-For-Blog
                  +  55:
                  +    name: Another-Example-For-Blog
                     4094:
                       name: MLAG

                  @@ -72,6 +74,14 @@
                       switchport_mode:    'access'
                       access_vlan:        '30'
                       channel_group:      '4'
                  +  Ethernet5:
                  +    shutdown:           'False'
                  +    description:        'Example-For-Blog'
                  +    interface_type:     'layer2'
                  +    switchport_mode:    'access'
                  +    access_vlan:        '50'
                  +    portfast:           'True'
                  +    bpduguard:          'True'
                     Ethernet8:
                       shutdown:           'False'
                       description:        'thisisatest'
----------
          ID: Sync Grains
    Function: module.run
        Name: saltutil.sync_grains
      Result: True
     Comment: Module function saltutil.sync_grains executed
     Started: 00:44:44.171661
    Duration: 2676.818 ms
     Changes:
              ----------
              ret:
----------
          ID: Refresh Grains
    Function: module.run
        Name: saltutil.refresh_grains
      Result: True
     Comment: Module function saltutil.refresh_grains executed
     Started: 00:44:46.848994
    Duration: 7.882 ms
     Changes:
              ----------
              ret:
                  True
----------
          ID: Render and Apply Configuration
    Function: module.run
      Result: True
     Comment: pyeapi.config: ---
              +++
              @@ -25,8 +25,11 @@
               vlan 30
                  name RackSubnet
               !
              -vlan 60
              -   name Jenkins-Deploy
              +vlan 50
              +   name Example-For-Blog
              +!
              +vlan 55
              +   name Another-Example-For-Blog
               !
               vlan 4094
                  name MLAG
              @@ -98,6 +101,10 @@
                  channel-group 4 mode active
               !
               interface Ethernet5
              +   description Example-For-Blog
              +   switchport access vlan 50
              +   spanning-tree portfast
              +   spanning-tree bpduguard enable
               !
               interface Ethernet6
               !
     Started: 00:44:46.857240
    Duration: 2790.379 ms
     Changes:
              ----------
              pyeapi.config:
                  ---
                  +++
                  @@ -25,8 +25,11 @@
                   vlan 30
                      name RackSubnet
                   !
                  -vlan 60
                  -   name Jenkins-Deploy
                  +vlan 50
                  +   name Example-For-Blog
                  +!
                  +vlan 55
                  +   name Another-Example-For-Blog
                   !
                   vlan 4094
                      name MLAG
                  @@ -98,6 +101,10 @@
                      channel-group 4 mode active
                   !
                   interface Ethernet5
                  +   description Example-For-Blog
                  +   switchport access vlan 50
                  +   spanning-tree portfast
                  +   spanning-tree bpduguard enable
                   !
                   interface Ethernet6
                   !
----------
          ID: Save Configuration
    Function: module.run
      Result: True
     Comment: pyeapi.run_commands: [{'messages': ['Copy completed successfully.']}]
     Started: 00:44:49.647780
    Duration: 53.892 ms
     Changes:
              ----------
              pyeapi.run_commands:
                  |_
                    ----------
                    messages:
                        - Copy completed successfully.

Summary for leaf0101-1.lab
------------
Succeeded: 5 (changed=5)
Failed:    0
------------
Total states run:     5
Total run time:   6.740 s
You can see in the output above that a few things happened:
The YAML pillar file on the minion was updated with our changes
The minion synced and refreshed its grains (including our custom eos_vlans grain)
The minion rendered the Jinja2 template using the updated pillar data
The minion applied and saved the resulting configuration using PyEAPI
The resulting configuration on the switch looks like this:
leaf0101-1.lab#show vlan brief
VLAN  Name                             Status    Ports
----- -------------------------------- --------- -------------------------------
1     default                          active    Po99
10    Production                       active    Cpu, Po10, Po99, Vx1
20    Development                      active    Cpu, Po99, Vx1
30    RackSubnet                       active    Cpu, Po4, Po99
50    Example-For-Blog                 active    Po99, Vx1
55    Another-Example-For-Blog         active    Po99
4094  MLAG                             active    Cpu, Po99
leaf0101-1.lab#show run int eth 5
interface Ethernet5
   description Example-For-Blog
   switchport access vlan 50
   spanning-tree portfast
   spanning-tree bpduguard enable
Automating Salt State Deployments
What if every time we merge changes or files to a GitHub repository, those changes are automatically deployed to our Salt master and a state run is kicked off to update the configs on our switches? This would mean that any change to switch configurations in GitHub becomes effected in reality without additional intervention by the engineer. Your network infrastructure would be managed as code.
This is where Jenkins comes into the picture. It will be responsible for pulling files from our GitHub repository, deploying those files to our Salt master, and executing a state on the Salt master which applies the updated configs. Webhooks sent from GitHub are a convenient way to trigger this process. Jenkins will be configured to listen for webhooks, which are sent upon a successful merge, and which trigger a pipeline script to pull and deploy the updated repo to the Salt master.
This means that we must authenticate Jenkins with GitHub and the Salt master. In Jenkins, new SSH credentials can be created at Settings —> Security —> Credentials and referenced in our pipeline script by their IDs. Setting up authentication between all of this stuff is outside the scope of this guide, but plenty of resources are available to help you:
Jenkins and Git Integration using SSH Keys
Jenkins and Server Authentication
Creating the Jenkins Pipeline
From the Jenkins dashboard, select “New Item”, enter a name (e.g. "salt-deploy”), and select “Pipeline” from the list. Click “OK” to create it.

Configure the pipeline as follows, substituting your own GitHub repository and server information in the fields:


The Pipeline section is where the magic happens. This is where you define what exactly Jenkins will do. A copy of our script is below, with some helpful comments along the way.
pipeline {
  agent any
  options {
    timestamps()
    disableConcurrentBuilds()
  }

  // Set some variables. 172.31.47.152 is the internal
  // IP address of our Salt server in AWS. Our default
  // directory on the Salt master is /app/salt/data.

  parameters {
    string(name: 'TARGET_HOST', defaultValue: '172.31.47.152', description: 'Salt server private hostname or IP')
    string(name: 'REMOTE_DIR',  defaultValue: '/app/salt/data', description: 'Remote directory to sync into')
    string(name: 'BRANCH',      defaultValue: 'main', description: 'Git branch to deploy')
  }

  // GitHub login parameters. ssh_salt_key is configured
  // at Jenkins -> Settings -> Credentials.

  environment {
    REPO_URL   = 'git@github.com:getoutofmyyard/salt.git'
    GIT_CRED   = 'GitHub-salt-repo-pem'
    SSH_CRED   = 'salt-ssh-key'
    // If you want to pin what to copy, adjust RSYNC_SRC below (e.g., "files/ states/")
    RSYNC_SRC  = '.'
  }

  // Jenkins pipelines are broken into distinct stages.
  // Each has a specific job.

  stages {
    stage('Checkout') {
      steps {
        sshagent(credentials: [env.GIT_CRED]) {
          // Using Jenkins Git step with SSH creds
          checkout([$class: 'GitSCM',
            userRemoteConfigs: [[url: env.REPO_URL, credentialsId: env.GIT_CRED]],
            branches: [[name: "*/${params.BRANCH}"]],
            doGenerateSubmoduleConfigurations: false,
            extensions: [[$class: 'CleanBeforeCheckout']]
          ])
        }
      }
    }

    stage('Deploy via rsync') {
      steps {
        sshagent(credentials: [env.SSH_CRED]) {
          sh '''
            set -euo pipefail
            rsync -az --delete --exclude ".git/" ${RSYNC_SRC} "${TARGET_HOST}:${REMOTE_DIR}/"
          '''
        }
      }
    }

    stage('Verify on Salt master') {
      steps {
        sshagent(credentials: [env.SSH_CRED]) {
          sh '''
            set -euo pipefail
            ssh "${TARGET_HOST}" "ls -la ${REMOTE_DIR} | sed -n '1,40p'"
          '''
        }
      }
    }

    // Optionally trigger a Salt run after the
    // files are deployed to the master.

    stage('Trigger Salt state (optional)') {
      when { expression { return true } } // set to true if you want to auto-apply after deploy
      steps {
        sshagent(credentials: [env.SSH_CRED]) {
          sh '''
            set -euo pipefail
            ssh "${TARGET_HOST}" "sudo salt '*' state.apply apply_eos_config"
          '''
        }
      }
    }
  }

  post {
    success {
      echo "✅ Deploy complete to ${params.TARGET_HOST}:${params.REMOTE_DIR}"
    }
    failure {
      echo "❌ Deploy failed. Check console log."
    }
  }
}
There’s a number of things which need to line up for this to work, and your first attempt to run the job will fail in all likelihood. Luckily, Jenkins makes it very easy to view logs and reports for each job you run. To see them, select the build you want to investigate within the Builds window on the main page of your salt-deploy pipeline:
Looks like we have a few failed jobs. Let’s figure out why this is happening by clicking on the most recent one and then viewing the console output:

This job logged the following in the console output:
15:59:44  [ssh-agent] Using credentials jenkins
15:59:44  $ ssh-agent
15:59:44  SSH_AUTH_SOCK=/tmp/ssh-XXXXXXJv8uhf/agent.721515
15:59:44  SSH_AGENT_PID=721518
15:59:44  Running ssh-add (command line suppressed)
15:59:44  Identity added: /var/lib/jenkins/workspace/salt-deploy@tmp/private_key_16095456299787611913.key (root@ip-172-31-32-26.ec2.internal)
15:59:44  [ssh-agent] Started.
[Pipeline] {
[Pipeline] sh
15:59:44  + set -euo pipefail
15:59:44  + ssh 172.31.47.152 'sudo salt '\''*'\'' state.apply apply_eos_config'
16:00:02  leaf0101-1.lab:
16:00:02      Minion did not return. [No response]
16:00:02      The minions may not have all finished running and any remaining minions will return upon completion. To look up the return data for this job later, run the following command:
16:00:02
16:00:02      salt-run jobs.lookup_jid 20251020205945311110
16:00:02  leaf0101-2.lab:
16:00:02      Minion did not return. [No response]
16:00:02      The minions may not have all finished running and any remaining minions will return upon completion. To look up the return data for this job later, run the following command:
16:00:02
16:00:02      salt-run jobs.lookup_jid 20251020205945311110
16:00:02  ERROR: Minions returned with non-zero exit code
[Pipeline] }
16:00:02  $ ssh-agent -k
16:00:02  unset SSH_AUTH_SOCK;
16:00:02  unset SSH_AGENT_PID;
16:00:02  echo Agent pid 721518 killed;
16:00:02  [ssh-agent] Stopped.
[Pipeline] // sshagent
[Pipeline] }
[Pipeline] // stage
[Pipeline] stage
[Pipeline] { (Declarative: Post Actions)
[Pipeline] echo
16:00:02  ❌ Deploy failed. Check console log.
The logs reveal that minions leaf0101-1.lab and leaf0101-2.lab were unreachable by the Salt master when this job was run, so the job failed. The reason for this turned out to be these devices in my GNS3 lab were powered off. Bringing them back up and running a new build was successful, which is confirmed by the console output:
16:16:52  [ssh-agent] Started.
[Pipeline] {
[Pipeline] sh
16:16:53  + set -euo pipefail
16:16:53  + ssh 172.31.47.152 'sudo salt '\''*'\'' state.apply apply_eos_config'
16:17:05  leaf0101-1.lab:
16:17:05  ----------
16:17:05            ID: Distribute Pillar Data to Switch
16:17:05      Function: file.managed
16:17:05          Name: /tmp/leaf0101-1.lab.yaml
16:17:05        Result: True
16:17:05       Comment: File /tmp/leaf0101-1.lab.yaml updated
16:17:05       Started: 00:16:51.669721
16:17:05      Duration: 1220.181 ms
16:17:05       Changes:
16:17:05                ----------
16:17:05                diff:
16:17:05                    New file
16:17:05                mode:
16:17:05                    0644
...
... Lots of output!
...
16:17:05  Summary for leaf0101-2.lab
16:17:05  ------------
16:17:05  Succeeded: 5 (changed=5)
16:17:05  Failed:    0
16:17:05  ------------
16:17:05  Total states run:     5
16:17:05  Total run time:   6.971 s
[Pipeline] }
16:17:05  $ ssh-agent -k
16:17:05  unset SSH_AUTH_SOCK;
16:17:05  unset SSH_AGENT_PID;
16:17:05  echo Agent pid 695031 killed;
16:17:05  [ssh-agent] Stopped.
[Pipeline] // sshagent
[Pipeline] }
[Pipeline] // stage
[Pipeline] stage
[Pipeline] { (Declarative: Post Actions)
[Pipeline] echo
16:17:05  ✅ Deploy complete to 172.31.47.152:/app/salt/data
[Pipeline] }
[Pipeline] // stage
[Pipeline] }
[Pipeline] // timestamps
[Pipeline] }
[Pipeline] // withEnv
[Pipeline] }
[Pipeline] // node
[Pipeline] End of Pipeline
Finished: SUCCESS
In short, when troubleshooting a failed build of your pipeline, always take a look at the Console Output section to help you figure out what’s breaking!
Provisioning an Arista EOS Minion with ZTP
Much of the work included in this guide can be done up-front with Arista’s ztpserver pip package. ZTP allows us to create files, apply configs to the switch, install extensions, upgrade the EOS software, and more as soon as the switch is powered on. For our purposes, this means we can use ZTP and our existing Salt environment to bring switches from brand-new to fully-deployed as soon as they are powered on.
Here’s how we do it:
We create a YAML pillar file for the new switch in GitHub. This can be done well ahead of time.
The switch is powered on. ZTP installs the salt-minion extension and copies configuration files to the switch.
The switch attempts to reach the Salt master, which was configured by ZTP
The Salt master auto-accepts the new minion key. The Salt relationship establishes.
A Salt reactor is configured to apply the apply_eos_config state when the minion is accepted. The minion is configured immediately.
The switch’s configuration continues to be maintained and enforced via GitHub.
Configuring Apache, WSGI, and DHCP
Configuring a fully-functional ZTP server is a matter of some ceremony, as it requires setting up Apache and dhcpd in addition to the ztpserver package. Ironically, installing ztpserver is easy:
[jelliott@salt-master ~]$ python -m venv ztpserver-prod
[jelliott@salt-master ~]$ source ztpserver-prod/bin/activate
(ztpserver-prod) [jelliott@salt-master ~]$
(ztpserver-prod) [jelliott@salt-master ~]$ python -m pip install --upgrade pip && pip install ztpserver
Now we need to install apache2 and dhcpd, then configure them according to the ztpserver documentation. Start by installing the packages. The httpd-devel and python3-devel packages are needed to install mod_wsgi for Apache:
[jelliott@salt-master ~]$ sudo yum install -y httpd httpd-devel python3-devel dhcp-server
Install mod_wsgi for Apache and create /etc/httpd/conf.d/ztpserver.conf:
[jelliott@salt-master ~]$ source ztpserver-prod/bin/activate
(ztpserver-prod) [jelliott@salt-master ~]$ python3 -m pip install mod_wsgi
Collecting mod_wsgi
  Downloading mod_wsgi-5.0.2.tar.gz (498 kB)
  Installing build dependencies ... done
  Getting requirements to build wheel ... done
  Preparing metadata (pyproject.toml) ... done
Building wheels for collected packages: mod_wsgi
  Building wheel for mod_wsgi (pyproject.toml) ... done
  Created wheel for mod_wsgi: filename=mod_wsgi-5.0.2-cp312-cp312-linux_x86_64.whl size=753070 sha256=b3db569f2e4b86abe31986f981da82987d67b705053aad7db72c869b690cc6ae
  Stored in directory: /home/jelliott/.cache/pip/wheels/20/ff/89/b795934127969d1eb6a9edb07d8fc96f484e45e2b6e2f6736d
Successfully built mod_wsgi
Installing collected packages: mod_wsgi
Successfully installed mod_wsgi-5.0.2

[root@salt-master jelliott]sudo install -d -o apache -g apache -m 750 /var/run/wsgi

[root@salt-master jelliott]# cat /etc/httpd/conf.d/ztpserver.conf
Listen 8080

<VirtualHost *:8080>

    WSGIDaemonProcess ztpserver \
        user=apache group=apache threads=50 \
        python-home=/home/jelliott/ztpserver-prod \
        python-path=/app/ztpserver

    WSGIProcessGroup ztpserver
    WSGIScriptAlias / /etc/ztpserver/ztpserver.wsgi

    <Location />
        WSGIProcessGroup ztpserver
        WSGIApplicationGroup %{GLOBAL}

        # For Apache <= 2.2, use Order and Allow
        Order deny,allow
        Allow from all
        # For Apache >= 2.4, Allow is replaced by Require
        Require all granted
    </Location>

    # Override default logging locations for Apache
    ErrorLog /app/ztpserver/log/ztpserver_error.log
</VirtualHost>

[root@salt-master jelliott]# cat /etc/httpd/conf.d/00-wsgi-global.conf
WSGISocketPrefix /var/run/wsgi
Now we need to make sure Apache starts without errors or module crashes. It should listen on TCP 8080 by default:
[root@salt-master jelliott] systemctl start httpd
[root@salt-master jelliott] systemctl enable httpd
[root@salt-master jelliott] systemctl status httpd
● httpd.service - The Apache HTTP Server
     Loaded: loaded (/usr/lib/systemd/system/httpd.service; disabled; preset: disabled)
     Active: active (running) since Mon 2025-10-27 23:51:19 UTC; 4s ago
 Invocation: 26979744bde84616bd817f8e0a3a841e
       Docs: man:httpd.service(8)
   Main PID: 16717 (httpd)
     Status: "Started, listening on: port 8080, port 80"
      Tasks: 178 (limit: 5075)
     Memory: 29.9M (peak: 33.5M)
        CPU: 216ms
     CGroup: /system.slice/httpd.service
             ├─16717 /usr/sbin/httpd -DFOREGROUND
             ├─16718 /usr/sbin/httpd -DFOREGROUND
             ├─16720 /usr/sbin/httpd -DFOREGROUND
             ├─16721 /usr/sbin/httpd -DFOREGROUND
             └─16723 /usr/sbin/httpd -DFOREGROUND

Oct 27 23:51:19 salt-master systemd[1]: Starting httpd.service - The Apache HTTP Server...
Oct 27 23:51:19 salt-master (httpd)[16717]: httpd.service: Referenced but unset environment variable evaluates to an empty string: OPTIONS
Oct 27 23:51:19 salt-master httpd[16717]: AH00558: httpd: Could not reliably determine the server's fully qualified domain name, using fe80::c0c:45ff:fe6>
Oct 27 23:51:19 salt-master httpd[16717]: Server configured, listening on: port 8080, port 80
Oct 27 23:51:19 salt-master systemd[1]: Started httpd.service - The Apache HTTP Server.
Now that Apache is up and running, our ZTP server will be able to serve up files to our Arista switches. Next, we need to spin up dhcpd and configure it to serve our ZTP clients:
[root@salt-master jelliott] cat /etc/dhcp/dhcpd.conf
subnet 192.168.100.0 netmask 255.255.255.0 {
  range 192.168.100.200 192.168.100.210;
  option routers 192.168.100.1;
  option domain-name-servers 8.8.8.8;

  # Only return the bootfile-name to Arista devices
  class "Arista" {
    match if substring(option vendor-class-identifier, 0, 6) = "Arista";
    option bootfile-name "http://myztpserver:8080/bootstrap";
  }
}

[root@salt-master jelliott] systemctl restart dhcpd
Don’t forget to open up your firewall to allow traffic on TCP 8080 inbound to the ZTP server:
[root@salt-master jelliott] firewall-cmd --zone=public --permanent --add-port=8080/tcp
Configuring the ZTP Server
Now that all of the backend stuff is out of the way, we can finally configure the ZTP server, profile some Arista devices, and start provisioning them with the configs and files they need. The default ztpserver root directory is located in /usr/share/ztpserver by default, but our lab uses /app/ztpserver/data instead. This and other configurations are located in /etc/ztpserver/ztpserver.conf, which is the main configuration file for the ztpserver package. Our file is configured as follows:
#/etc/ztpserver/ztpserver.conf
[default]
# Location of all ztps boostrap process data files
# default= /usr/share/ztpserver
data_root=/app/ztpserver/data

# UID used in the /nodes structure
# default=serialnumber
identifier=serialnumber

# Server URL to-be-advertised to clients (via POST replies) during the bootstrap process
# default=http://myztpserver:8080
server_url=http://myztpserver:8080

# Enable local logging
# default=True
logging=True

# Enable console logging
# default=True
console_logging=True

# Console logging format
console_logging_format=%(asctime)-15s:%(levelname)s:[%(module)s:%(lineno)d] %(message)s

# Globally disable topology validation in the bootstrap process
# default=False
disable_topology_validation=True

[server]
# Note: this section only applies to using the standalone server.  If
# running under a WSGI server, these values are ignored

# Interface to which the server will bind to (0:0:0:0 will bind to
# all available IPv4 addresses on the local machine)
# default=0.0.0.0
interface=0.0.0.0
# TCP listening port
# default=8080
port=8080

[bootstrap]
# Bootstrap filename (file located in <data_root>/bootstrap)
# default=bootstrap
filename=/app/ztpserver/data/bootstrap

[neighbordb]
# Neighbordb filename (file located in <data_root>)
# default=neighbordb
filename=/app/ztpserver/data/neighbordb
Our ZTP root directory looks like this. If you are missing directories or files, you can simply create the directories and copy files over from the ztpserver GitHub page:
/app/ztpserver/data/
├── actions
│   ├── add_config
│   ├── configure_ansible_client
│   ├── copy_file
│   ├── install_cli_plugin
│   ├── install_extension
│   ├── install_image
│   ├── replace_config
│   ├── run_bash_script
│   ├── run_cli_commands
│   ├── send_email
│   ├── template
│   └── the_nick
├── bootstrap
│   ├── bootstrap
│   └── bootstrap.conf
├── definitions
├── files
├── neighbordb
└── nodes
Profiling Nodes for Zero-Touch Provisioning
As you can see, we have an empty directory called nodes. For each device we profile, we will create a new directory within nodes/ which is named as the serial number of the device we wish to provision. Within that device’s directory, we will define the desired startup configuration and whatever actions we wish to take against the Arista device during provisioning.
Let’s say I have a new Arista switch with a serial number of ABC12345678. To get this ready for ZTP, let’s create a directory for the device and add a couple of files to it: the definition file, which contains a list of actions; the startup_config file which will contain basic Arista EOS configs; and a few additional items related to the Salt minion config:
#/app/ztpserver/data/nodes/ABC12345678/definition
---
actions:
  -
    action: install_image
    always_execute: true
    attributes:
      url: /app/ztpserver/data/files/images/vEOS-4.31.1F.swi
      version: 4.31.1F
    name: "Validate EOS Version"
  -
    action: replace_config
    always_execute: true
    attributes:
      url: /app/ztpserver/data/nodes/ABC12345678/startup_config
    name: "Apply Management Config"
  -
    action: install_extension
    always_execute: true
    attributes:
      url: /app/ztpserver/data/files/extensions/salt-3005-1-1.32.swix
    name: "Install the Salt Minion Extension"
  -
    action: copy_file
    always_execute: true
    attributes:
      src_url: /app/ztpserver/data/nodes/ABC12345678/minion
      dst_url: /etc/salt/minion
      overwrite: replace
    name: "Configure the Salt Minion"
  -
    action: copy_file
    always_execute: true
    attributes:
      src_url: /app/ztpserver/data/nodes/ABC12345678/salt-minion.service
      dst_url: /usr/lib/systemd/system/salt-minion.service
      overwrite: replace
    name: "Apply VRF Configuration to salt-minion.service"
  -
    action: copy_file
    always_execute: true
    attributes:
      src_url: /app/ztpserver/files/pyeapi.conf
      dst_url: /etc/salt/minion.d/pyeapi.conf
      overwrite: replace
    name: "Add PyEAPI Configuration to the Salt Minion"
  -
    action: run_bash_script
    always_execute: true
    attributes:
      url: /app/ztpserver/data/nodes/ABC12345678/restart-salt.sh
    name: "Restart and Enable the Salt Minion Service"
There are several actions prescribed in the definition file for this switch. Here’s a brief explanation of each action:
Check the EOS version of the switch. If it’s not 4.31.1F, copy the image to the switch and upgrade or downgrade to that version.
Replace the configuration with the startup_config found in the node’s directory.
Install the Salt minion extension on the switch.
Replace the Salt extension’s default config file with one prepared for this switch. Recall from Installing the Salt Extension for Arista EOS that the minion file contains the URL and public key of the Salt master, as well as the unique minion ID for this switch.
Replace the Salt minion service file with a new version which uses ip netns exec ns-mgmt to execute the Salt minion. This was covered in an earlier section, Installing the Salt Extension for Arista EOS.
Add the PyEAPI configuration file to /etc/salt/minion.d/pyeapi.conf. Recall that this is required for PyEAPI to authenticate against the switch when performing commands or configurations.
Execute a script which runs the following commands to bring up the Salt minion:
   systemctl daemon-reload
   systemctl enable salt-minion
   systemctl restart salt-minion
When the switch powers on for the first time, ZTP will run through this workflow. resulting in a configured Salt minion which is actively attempting a key exchange with the Salt master. In our example, we created a basic startup_config file for this switch to enable it to communicate with the Salt master. The rest of its configs are stored in GitHub as pillar data and will be applied by Salt after the minion’s key is accepted.
You can optionally configure the Salt master to auto-accept minion keys and even trigger a state run when a new key is accepted, allowing the switch to receive its full configuration without any manual input from the engineer. Keep in mind, however, that automatically accepting minion keys is generally discouraged for security reasons, so we won’t provide examples of it here. If you’re interested in exploring that option further, refer to the official Salt documentation.
Here’s our startup_config file to be used by ZTP:
! /app/ztpserver/data/nodes/ABC12345678/startup_config
!
hostname leaf0101-1.lab
!
vrf definition management
!
management api http-commands
   protocol unix-socket
   no shutdown
   !
   vrf management
      no shutdown
!
ip name-server vrf management 8.8.8.8
!
ip routing vrf management
!
ip route vrf management 0.0.0.0/0 10.254.0.1
!
interface Management1
  vrf management
  ip address 10.254.0.50/24
  no shutdown
The addition of ZTP to our Salt-Jenkins-GitHub workflow offers some powerful advantages, especially in modern data center contexts where new server racks are constantly being installed. With this automation workflow in practice, a network engineer could feasibly plan the entire network configuration for a data center before a switch is ever unboxed. Then, when the time comes, switches are powered on and receive their full configurations within minutes, which continue to be maintained and enforced your code in GitHub.